
Looking for ways to foster engagement with your students in the classroom or online? You might want to take a look at Lucid’s Education Suite. With your Canvas account, you get free full access to the Lucid Education Suite, available to Siena Community, faculty and students! Lucid’s Education Suite includes two apps: Lucidchart and Lucidspark. Lucidchart is an intelligent diagramming application that allows you to visualize complex ideas, systems, and processes. Lucidspark is a virtual whiteboard application that enables teams to ideate, design, and build better ideas.
The Lucid integration provides tools that enhance engagement in learning, boost student collaboration, and enrich your course content. You can access the Lucid Education Suite directly from the Rich Contend Editor (RCE) or create engaging assignments with the new assignment submission that allows a student to submit a Lucid document as the artifact that shows their learning. And it’s compatible with SpeedGrader!
Setting Up the Integration
When accessing Lucid for the first time, you must verify course information and connect your Lucid account to your Canvas account before Lucid can be used in your course. Follow the instructions below to complete the one-time account setup.
If this is your first time using the Lucid integration in Canvas as a teacher, follow these steps to register for a Lucid account or connect to an existing one.
1. In Canvas, open a new Canvas announcement, assignment, page, quiz, discussion, or syllabus.
2. From the Rich Content Editor (RCE) toolbar, click the Lucid icon ![]()

3. Follow the instructions on the screen. If you do not have a Lucid account, click Sign up. A Lucid account will be created for you connected to the email address on your Canvas account. If you have a Lucid account but are not logged in, click Log in. If you are already logged in to a Lucid account, click Connect to Lucid.
4. Review the permissions and click Grant Access.

Your Lucid account should now be connected, allowing you to access, create, and edit documents from Canvas!
You may also review the video below, provided by the vendor.

How to Embed a Lucid Document in Canvas
After connecting your Lucid account to Canvas, you can embed new or existing Lucid documents into the Rich Content Editor (RCE) in Canvas. Embedding a Lucid document into an assignment’s Rich Content Editor (RCE) allows students to view or edit the same document. Any edits made by one student are visible to other students, making this option great for classroom discussions, brainstorming sessions, icebreakers, etc.
To embed a Lucid document, follow these steps:
1. Open a new Canvas announcement, assignment, page, quiz, discussion, or syllabus.
2. From the Rich Content Editor toolbar at the top, click Lucid icon in the Canvas editor toolbar. the Lucid icon ![]() .
.

3. In the panel that appears, you can: (a) Select an existing Lucid document; or (b) Click “+ New” in the top-left corner, choose LucidChart or LucidSpark and then select “Blank Document” or “Create from Template”. Follow the instructions on the screen to confirm your selection/creation of the document.

4. You will then be asked to review/select the embed settings.
- Under Access Settings, click one of the following radio buttons:
- Edit: other users can edit, view, or leave comments in the embedded document.
- Comment only: other users can view the embedded document and add comments.
- View only: other users can view the embedded document.
- Note: If you choose the View only access setting, you can choose which pages to display and which Lucid viewer type to use. You can enable or disable the embedded document to automatically update by selecting the checkbox next to Automatically update the document when the integration loads.
5. Click the Insert button after making your selections.

6. You should now be able to view & edit the embedded Lucid document in the Rich Content Editor (RCE).

- Note: You can increase the size of the Rich Content Editor (RCE) window by doing any of the following:
- Click and hold the Resize icon, at the lower right corner of the RCE window. Then drag the RCE window to the desired size.
- Click the Fullscreen icon, at the lower right corner of the RCE window, to expand the RCE to full screen view.
- Click the View menu and select the Fullscreen option.
Be sure to save any changes before leaving your Canvas page!
Additional guidance
For additional guidance on how to embed collaborative activities within your Canvas LMS content, please watch the video below from the vendor:

How to Create a Lucid Assignment
When creating or editing an assignment, you can choose to use Lucid Education Suite as a submission type. This allows students to connect to and submit Lucidchart or Lucidspark documents. This process makes a unique copy of a new or existing Lucid document for each student, allowing them to complete and submit their work directly in Canvas. Any edits a student makes is visible only to them, making this option great for individual assignments, worksheets, projects, etc. You can then grade the submissions in SpeedGrader.
To create an assignment using a Lucid document, follow these steps:
1. Open a new assignment in Canvas.
2. Enter an assignment name.
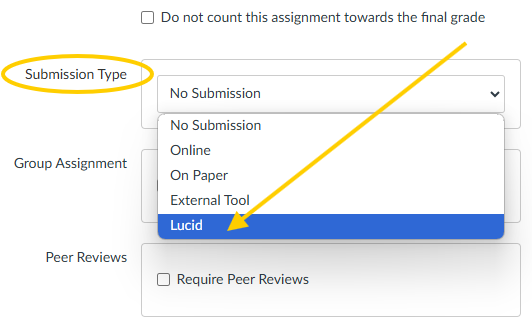
3. Next to “Submission Type,” select Lucid from the dropdown menu.
4. Click Lucid.

5. Click Lucidspark or Lucidchart depending on your assignment. Then click Next.

6. Select what type of document you want students to have a copy of:
- Blank document/Blank board: Gives students a blank Lucid document to work from for their assignment.
- My documents: Allows you to choose a template or one of your existing documents for students to work from.
7. Then click Next.

Note:
- If you chose to select from your Lucid documents, select the document you want students to have a copy of, then click Select.

8. To choose from the premade templates, click + New in the top-right corner, click Create from Template, then select a template and click Create. You will need to click Select again.


9. If you are ready to publish your assignment, click the Save & Publish button. If you want to create a draft of your assignment and publish it later, click the Save button.
Additional guidance
For additional guidance on how to create assignments with Lucid within Canvas, please watch the video below from the vendor:
